Showing posts with label NBHW. Show all posts

Friday, 7 February 2025

Khalkin Gol - the game(s)!

 With my blogging hiatus, I realised that I never posted any links to the culmination of the Khalkin Gol project - the game(s) themselves!

I ran two games at club for this, firstly the short attack by the Japanese at the start of the campaign, the attack of the Azuma detachment which served as a preliminary battle in the campaign.

Khalkin Gol - Azuma

and next, the main battle itself!

Khalkin Gol - main

It reminded me that I never did refight the final battle at club, what with moving and packing.....looks like I will have to refight the other two again then!


(Rapid Fire 2 rules used)

Monday, 2 December 2024

TYW Harquebusiers

 Another unit for my late war French TYW army for Rocroi.

This is a Weimarian unit, as the troops of Bernard de Saxe-Weimar went over to the French after his death.

A unit of Harquebusiers.


See them in action here, at our recent club refight of Lutzen 1632.

https://www.facebook.com/media/set/?set=a.963604529147216&type=3


Tuesday, 24 September 2024

Second Sino-Japanese War Chinese forces

Chinese 1937-39

Another project I completed whilst away from the blog was a small force of Chinese forces to fight by large Japanese collection, so would be Second Sino-Japanese war or early WW2. 

Those forces provide an interesting challenge for the wargamer; the country was still recovering from the Warlord era, and Chiang-Kai-Shek had sought support from the Nazi regime in Germany and later, the Soviet Union (which of course links to the wider strategic picture of which Khalkin Gol was part). As such, Chinese forces were a mish-mash of uniforms, equipment. Organisation was left very much to local warlords. 

The force I have based my collection on is post-Shanghai, where most of the better troops were lost, but not so late that there was nothing left of them, or the Americans had started to supply them. So, we can place this force in the 1937-39 kind of era. I haven't gone with any troops who were only armed with hand weapons!

The figures are also a mish-mash - some Foundry, some 1:72 miniatures, some Lancashire games, with some EWM and Zvezda early Germans standing in for some of the support weapons, too.

The Regimental HQ, with hand painted banner.


Regimental support weapons. These were well prized by the Chinese and kept at a regimental level.


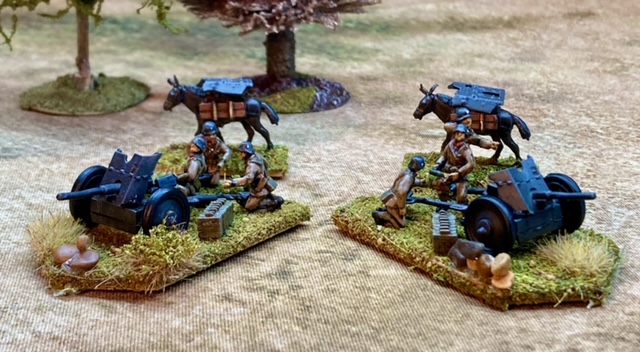
German influence here: Pak 36 A/T guns. Notice mule transport as standard.


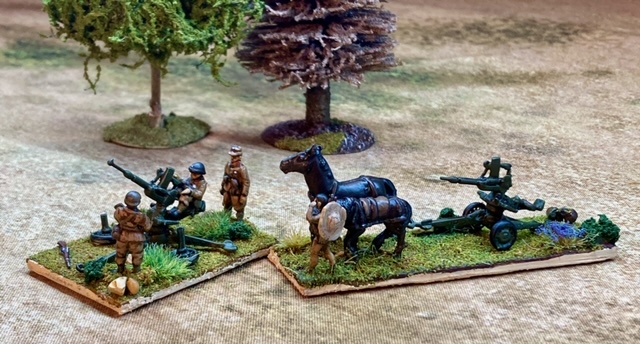
Oerlikon 20mm AA cannon. 


Armoured(!) support. Took a little bit of liberty here as they probably weren't serving at the same time/together, but the Chinese did have access to these. 
A PzI, T26 and two Cv33 tankettes.


Artillery was very limited to the Chinese, including the rounds. As such just one old Krupp 75mm.


And infantry! I read that Chinese tended to have smaller companies (I can't remember where to be honest) and so there are only 6 figures per company.


And, they have seen action down at NBHW! Please see the photos and report here:
https://www.facebook.com/media/set/?set=a.6013540088698817&type=3&locale=en_GB

If this is new to you and interests you, I started with the Osprey books on the subject (The Chinese Army, Chinese Civil War Armies and Chinese Soldier vs Japanese Soldier) whilst please do also look at the 'Wargaming China' YouTube channel.

Thank you for reading.

Monday, 17 September 2018

More Naval gaming

Life is settling down at home.... a bit! It has been crazy for the past year or so hence a reduction in blogging.

We are planning to run the Battle of Trafalgar at club next month. Here is one of the warm up games...

https://www.facebook.com/pg/New-Buckenham-Historical-Wargamers-302874659765417/photos/?tab=album&album_id=2135240289862169

Sunday, 6 November 2016

Villiers-le-Sec at NBHW

I played the Villiers-le-Sec scenario from the Normandy Battle Games book at NBHW last night. First venture out for my old Wehrmacht Infanty Regiment as I've mainly played with my Panzer Lehr thus far.

Good even contest which could've gone either way:

https://www.facebook.com/New-Buckenham-Historical-Wargamers-302874659765417/photos/?tab=album&album_id=1342995955753277


Saturday, 3 September 2016

Aboukir Bay - the battle of the Nile.

After many months and much painting and rigging, I was finally able to bring my Battle of the Nile game to NBHW. The scenario is from the BBIB rulebook, with a couple of very minor tweaks. It was an enjoyable refight which went largely to history, albeit with some help from the dice gods who were definitely on the side of Nelson and his band of brothers on this occasion.

The scenario is arranged with the French at anchor for the whole game, and much reduced shore-facing broadsides with special scenario-specific ship record cards to reflect this. Nelson and the British caught the French at their most complacent and with many sailors still on shore! That is not to say it is a walk in the park for the British, who need to win by 8 clear ships, and raging fires, disabled and grounded British ships counting as French successes.


We lined up with Ryan, Tony and Chris taking the French and Gary, Steve, Paul, Jim and Darren the British. Ryan, Gary and Peter - who couldn't attend - also contributed ships to the battle.


The British did not get off to the best of starts, when the lead ship, HMS Goliath, was grounded coming into the bay on the very first dice roll! This left HMS Zealous and HMS Orion leading the British ships toward the French line. In a sign of things to come the early full French broadsides on the oncoming British failed to score any hits, and the Goliath was soon free of the shoals and joining the action with some help of the brig Mutine. Most of the other British entered the bay without issue with the exception of HMS Defence in the middle of the battle line who was briefly grounded but again, quickly refloated herself.


Failing to slow the British advance, and with the British lead ships following history and coming around to the shore side of the French, the French van was soon under sustained attack causing the first French ship, Guerrier, to strike its colours and be seized by HMS Zealous. The second French ship, Conquerant, also struck but sank before it could be captured. The French by now were scoring hits, but these were causing minor damage to the British who were able to repair these off quickly with again, some good dice rolling.


HMS Theseus chose to brave sailing straight at the French line, with the order cards helping it just avoid the possibility of a bow rake as it approached the French ship Aquilon. The rookie Captain Darren misjudged the wind a little which took Theseus straight into Aquilon with the Captain giving the order to board. This could've gone either way with two evenly matched 74s, but the Theseus emerged triumphant with the Aquilon a prize and the third French ship to fall.


It was not completely plain sailing for the British as HMS Minotaur, with steerage damage, was forced to collide with HMS Leander, but Spartiate was soon bombarded with broadsides and struck, being captured by HMS Audacious.


The small French frigate Serieuse, seeing the ships of the line being mauled, decided to do what it could and heroically took on the British flagship HMS Vanguard, which had come around to the shore side. A broadside was ineffective so the Captain gave the order the board! The action was easily repelled and the Vanguard counter-boarded and took the small frigate.


HMS Minotaur continued it's enforced rampage being unable to steer and went on to ram the French flagship L'Orient, which used the opportunity to board the British ship and overcome its crew to give the French their first success of the day.


However, the generally poor French dice rolling continued and the British, realising the French were weaker on the shore side, started to move through, and down, the French line, with the French captains still only able to inflict minor damage to the British who were still repairing well.


Peuple Souverain and Franklin both struck their colours, captured by HMS Audacious and HMS Alexander in turn, but in another small French positive the little frigate Artemise pulled 2 jokers on HMS Leander giving it some hefty fires to deal with and the chance of another French success.


The British were still winning the attritional stakes, however, as in a blow for the French L'Orient struck its colours and was captured by HMS Alexander, and Heureux also struck, captured by HMS Bellerophon ("Billy Ruffian"). However, at this point HMS Goliath became grounded on the Eastern shoals, and without the brig to assist this could've again been another French success if it remained there for the game.


French hopes also lay in some boarding actions instigated by the British. HMS Majestic boarded the Tonnant, and seeing an opportunity, the frigate Artemise also boarded to assist the larger ship. Nevertheless, again the dice were against the French as the Tonnant was captured and then when HMS Alexander joined to assist then the brave French frigate was also captured.

French hopes of other successes were also soon smothered as HMS Goliath again freed itself from the shoals and to rub salt in the wound a massive single broadside from it sunk the frigate Diane which had engaged HMS Orion in a cheeky - but unsuccessful - stern rake.


Using the same tactics as the Artemise, the frigate Justice assisted the Mercure as it was boarded by HMS Bellerophon, but with some ungentlemanly conduct both HMS Swiftsure and HMS Majestic fired broadsides into the boarding action damaging all three ships.

Hopes of HMS Leander's fires developing to 'raging' were dashed too, as some fortunate repair rolling with only 3 crew stars available saw the lucky Leander put them all out!

HMS Orion and HMS Zealous had now reached the final French ships, and as Orion rounded the stern of the Timoleon, the cards assisted the British again with two stern rakes and a massive amount of damage being dealt to the French ship. It soon struck its colours and was captured by HMS Orion.


In the final action of the game, HMS Audacious came to assist HMS Bellerophon against the Mercure and Justice, and the overwhelming numbers of Jolly Jack Tars took the two French ships.


So, a British victory by 11 ships to 1, with just the Genereux and Guillaume Tell left, as historically happened (although 2 frigates got away in the real thing too). In a minor deviation from history, though, 10 of the French ships were captured and only one - Conquerant - destroyed. This compared to 9 captured historically - one being destroyed later - with L'Orient famously exploding and Timoleon being scuttled by the crew.

Historically, one British ship was grounded and 7 severely damaged in the battle including Bellerophon which was also dismasted. The British got off much more lightly in this refight. The players kept more on the move rather than anchoring as many ships did historically and also kept more ships on the shore side of the French. However, as I've said, this could've been a lot closer but for some disastrous French dice, fortunate British dice, and few order cards that came just at the right time! But that's the beauty of BBIB, that element of randomness makes it enjoyable even if you're getting hammered!

Here is a map of the historic battle, from wikipedia:


There is talk of looking at Trafalgar at the club - so watch this space!

For more photos - over 100! - please also check out the NBHW's Facebook page:

https://www.facebook.com/New-Buckenham-Historical-Wargamers-302874659765417/photos/?tab=album&album_id=1274193072633566


Friday, 17 June 2016

Lipovec, 1941 at NBHW

I took my Slovaks and Russians up to NBHW this week, and put on a version of the Rapid Fire Lipovec scenario.

Historically, this was the first proper action by the Slovak Rapid Brigade on the Eastern Front in July 1941. The Slovak tanks and A/Cs, supported by infantry, managed to fight their way into the town, only for a strong Russian counter attack to cut them off and destroy their artillery. They then staged a fighting withdrawal back to their lines pursued by the Russians, before they managed to hold the line with the help of their German allies.

In our battle, the Slovaks consisted of a Recce battalion (bicycle company, motorised infantry company, OaVz30 Armoured Car and a 75mm infantry gun company), 2 companies of tanks (1 of Lt.35s and 1 of Lt.38s), a motorised infantry battalion and a battery of 105mm artillery. They entered the game across three turns. They also had an Avia B534 fighter/bomber for some extra support.

Facing them, split across a rearguard group and the Lipovec garrison was a Russian infantry battalion, with 3 x 122mm artillery pieces (direct fire only), A/T company, infantry gun and Quad Maxim AA truck. A second infantry battalion was also in line to provide the counter attack.

The table was set up and the motley crew took their positions:


The lead Slovak units, the A/C and bicycle company, moved up the road towards Lipovec but soon came under fire from a reinforced infantry company dug in on the hill to the north, and another just off the road, ahead of them to the east, as well as a 122mm battery over the river.


A hidden A/T rifle unit in the maize field also got off a couple of shots, to no effect, before being killed by the remainder of the bicycle company.


Turn 3 saw the bulk of the Slovak forces on the table. The brave Armoured Car was taken out by reserved A/T fire from Lipovec just before the bridge. The reinforced infantry company on the hill to the east was attacked with HE fire from two of the Lz35 tanks, to little effect, while one of the tanks received some light damage from the artillery in the woods.


The air support soon arrived, dropping its two bombs on an artillery battery on the hill, destroying the gun and killing some crew.


Meanwhile, on the northern flank, a Slovakian infantry company from the motorised battalion joined the motorised recce company and prepared to attack the wooded hill. They were supported by the battalion A/T company, firing HE, as well as the recce infantry gun and 105mm artillery battery.


On the southern flank, the rest of motorised battalion moved up towards the high ground in their Praga trucks, with the BHQ in its Tatra car following.


In the centre, more anti tank fire from Lipovec damaged an Lz35.


This spurred on the Russian defenders, whose RHQ ordered the defending infantry and A/T gun across the bridge to take on the Slovakian tanks. This was too late for the 122mm battery in the woods, whose crew was killed by HE fire from the armoured unit. The crew from the other, destroyed, gun mounted their limbers and headed across to man the still functional gun.


The B534 returned to strafe the infantry company on the eastern hill.


The attack on the northern, wooded, hill was having little effect despite a huge amount of ordnance dropping on it, while on the southern flank the MG company truck was destroyed by artillery fire from the final 122mm gun, albeit not before the MG had debussed and deployed.


The infantry from Lipovec passed a Heroic action test and assaulted the Lz35 tank with molotov cocktails, causing the crew to bail and the rest of the company to fall back in good order, firing on the northern hill as they did so. The B534 attempted to strafe the same company on the eastern hill but was driven off, while on the northern flank the infantry moved across the open ground to attack the wooded hill under MG fire from the unit deployed there. The barrage of HE fire started to eat into the defenders.


The A/T gun deployed on the bridge but could not damage the Lt38s crossing the river.


The infantry, however, continued to assault the empty Lz35, destroying it and causing the remainder of the Lz35 tank company to rout off the table. Things went better on the northern flank, as the mixed assault under heavy artillery support wiped out the final resistance on the wooded hill, including the battalion HQ. Nevertheless, the rest of the rearguard and the garrison held strong. To the south, the infantry companies debussed and moved across the river under fire from the 122mm, 76mm and Quad Maxim from Lipovec and from the reinforced company on the hill. The B534 attempted to strafe that company again, but was driven off for a second time and forced to return to base for lack of fuel.


As the evening drew to a close, the Lz38s moved into Lipovec itself, with the northern flank beginning to get themselves back into their trucks, and the southern flank finally wiping out the crew of the 122mm, while to the north the 'other' 122mm crew had reached the 'other' 122mm gun. Fire from the company on the hill destroyed the Slovak BHQ to the south.


We ran out of time to bring on the Russian reinforcements, but as we reflected we felt that with the new Russian battalion about to come on and overrun the trucks to the south, and with a tank company gone, the Slovaks would probably be forced to withdraw, especially as the Lipovec defenders still had 2 infantry companies, a 122mm, the 76mm infantry gun, A/T gun and quad maxim available on top of the reinforcements.

As such, the battle played out much as it had done historically. Well played to all and thanks to the guys at NBHW for a good game! Thanks also to Ryan and Andy for some of these photos.